
How to Use AI Grid Maker: Choose a Style, Generate, and Download
Follow PhotoGrid's AI Grid Maker workflow: upload a photo, choose a style and output frame, check credits, add optional direction, and review your result.
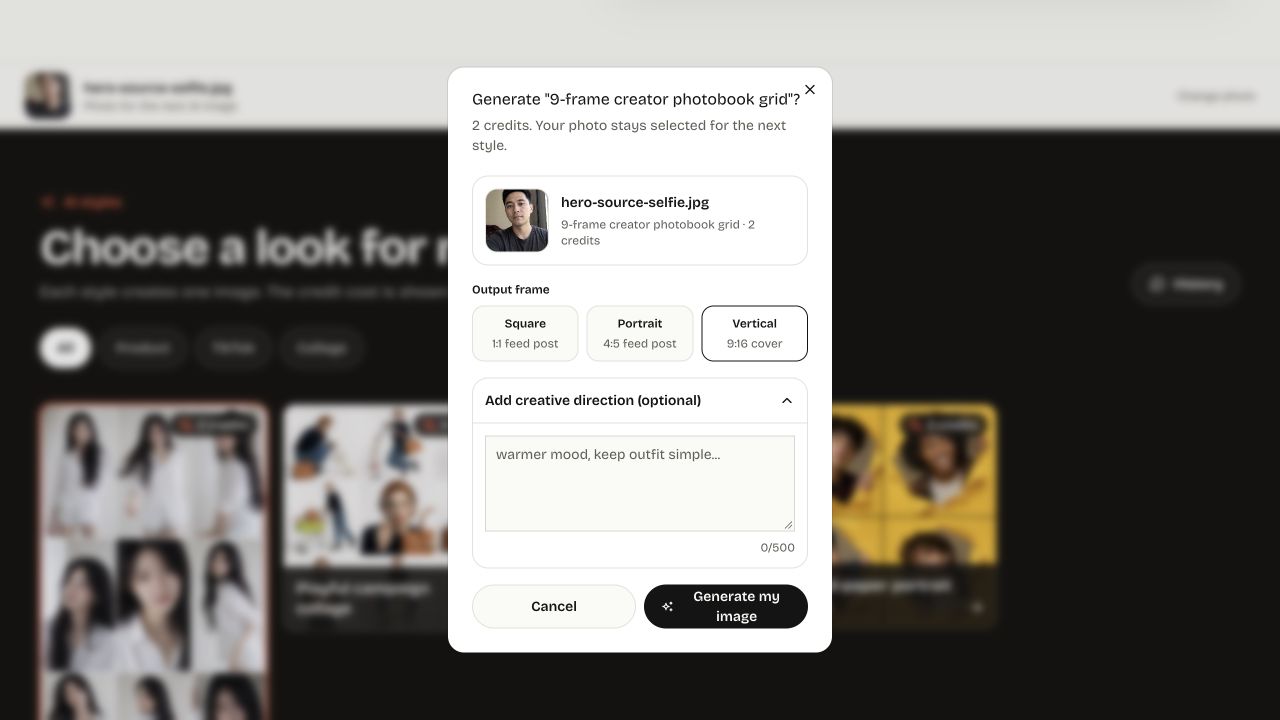
AI Grid Maker uses one reference photo and a style template to generate a new image. You choose the look, output frame, and optional creative direction, then review the result before downloading. Generation requires a signed-in account and enough credits for the selected style.
For your first attempt, upload from the main page before selecting a style. This opens a settings screen where you can review the frame and cost before clicking Generate my image. Choosing a style first follows a different flow: uploading inside that style's dialog starts generation immediately when you are signed in and have enough credits.
What should you prepare for AI Grid Maker?
Use a JPG, PNG, or WebP image up to 10 MB. For a portrait style, choose a photo with a clearly visible face, even lighting, and enough space around the head. For a product style, make sure the product's shape and important details are visible. A simple background makes it easier to judge what changed.
Crop out distractions before uploading. Avoid a tiny face in a large scene, heavy blur, or a screenshot with interface elements around the photo. These are practical starting points, not a guarantee that every generated detail will be correct.
AI generation uploads your image for processing. If you only want to arrange existing photos into cells, use Photo Grid Maker. To divide one photo into separate posts, use Instagram Grid Splitter.
1. Upload your photo from the main page
Open AI Grid Maker and click Choose my photo near the top of the page. Select your source image, then browse the style gallery. Your photo stays selected while you look through the cards.
This initial upload selection does not start a generation. It gives you a chance to choose a style and review its settings first.
2. Choose a style and check its credit cost
Use the gallery categories to narrow the options, then click a style card. The gallery images illustrate each style; they are not previews generated from your uploaded photo.
With a photo already selected, the Generate "[style name]"? dialog shows your filename, a thumbnail, the style name, and its cost in credits. Check that the thumbnail is the source you intended to use. If it is wrong, cancel and replace the photo from the main page.
Read the cost shown for that specific style. Do not assume every template costs the same. You can check your balance in Credits; each new generation uses credits, including another attempt with the same photo.
The screenshot at the top of this guide shows the setup controls, not a generated result. Review your photo, frame, and displayed cost before clicking Generate my image.
3. Set the output frame
The Output frame control has three choices:
| Choice | Requested shape | Useful starting point |
|---|---|---|
| Square | 1:1 | A square post or contact sheet |
| Portrait | 4:5 | A taller feed image |
| Vertical | 9:16 | A full-height cover image |
The frame controls the shape of the whole image. The selected template controls the arrangement inside it. Choosing Square does not set the number of panels, and choosing Vertical does not create a video.
A style can start with its own default frame, so review this setting whenever you select another template. After generation, check the downloaded image's dimensions and crop in the app where you plan to use it.
4. Add creative direction only if you need it
Expand Add creative direction (optional) for a text field with a 500-character limit. Leave it empty for a first attempt with the template's default direction, or add a short note about the mood, colors, or background.
For example, with a color portrait style:
Warm colors, a plain background, and a relaxed expression.
The note supplements the style template. It does not replace the template or provide precise control over individual panels. If the layout itself is wrong for your goal, choose a different style instead of adding a long list of conflicting instructions.
5. Generate and follow the progress
Once the photo, style, frame, and cost are correct, click Generate my image.
If you are signed out, the page asks you to sign in or create an account. On returning, use Continue with my photo, review the setup, and confirm. If your balance is too low, the credit dialog shows the required amount and the amount available.
When buying credits from a saved generation task, returning from successful checkout can resume that generation automatically. Finish choosing your settings before continuing to checkout.
The result drawer shows progress while the job runs. Avoid submitting another attempt just because the first one has not finished. You can also open History to check your jobs.
6. Inspect the result before downloading
When the drawer shows Ready, expand it to compare the complete original and result side by side. Check the whole composition first, then inspect details that matter to you:
- In portraits, compare facial features across panels and look closely at eyes, hands, hair, and clothing.
- In product images, check the product shape, labels, and any visible text.
- Check panel borders and the outer crop. Make sure nothing important has been cut off.
The output is generated content, so familiar details can change. A finished job means an image was produced; it does not mean every detail passed a quality check. Download a version you want to keep before starting another attempt, and change one thing at a time when comparing results.
Click Download my image to save the image. A multi-panel composition is delivered as one image, not a ZIP of separate posts. If you need individual tiles, follow the Instagram grid guide after downloading.
What if something goes wrong?
| What you see | What to do next |
|---|---|
| The browser cannot save the photo before sign-in or checkout | Try a smaller image and check that browser storage is enabled. |
| The credit dialog appears | Check the selected style's cost and your signed-in balance before continuing. |
| Generation is still running | Check the current job in History before submitting again. |
| “Image couldn't be processed” or “Image generation failed” | Open the original if the option is available, or choose another photo. Check History and your credit balance before retrying. |
| The job finishes but the subject looks wrong | Use a clearer source, try a closer crop, or choose a simpler style. A new attempt uses credits. |
Common questions
Do I need an account to browse styles?
You can browse styles and review settings without signing in. An account and sufficient credits are required to generate an image.
Can I try another style without uploading again?
Yes. The source photo stays selected, and the result drawer offers another style when one is available. Review its cost and settings before generating. Reusing the photo does not make the next generation free.
Will the same photo and settings produce an identical result?
Do not rely on an exact repeat. Save the result you want to keep; this interface does not expose a seed control for reproducing the same generated image.
Is AI Grid Maker the same as a photo collage or image splitter?
No. AI Grid Maker generates new visual content using your source as a reference. A collage tool arranges your existing photos, while a splitter divides an existing image into tiles. Choose based on whether you want new imagery, a layout, or separate files.
For a first run, start with one clear photo and one suitable template. In AI Grid Maker, review the frame and credits before generating, then inspect the result at the size you intend to use.